

How To Change Git Starting Path To Desktop
Introduction
Git is the world's most popular version control organisation (VCS), and, consequently, knowing how to use Git has become a mandatory skill in the globe of coding.
In this step-past-pace beginner's guide, you will learn how to beginning using Git effectively.
What Is Git and What Is GitHub
Git is a free, open-source, distributed version control system that handles source code changes in software projects of all sizes. Git allows multiple developers to work together on the same project with ease.
On the other hand, GitHub is a company that offers a cloud-based repository allowing developers to store and manage their code and to rail and control code changes. Y'all can apply Git without GitHub, merely you can't use GitHub without Git.
Notation: Read about Git in more detail in our article on what is Git. And to learn more than about git workflows, read our article on how git works.
Git Tutorial: How to Use Git {Beginner's Footstep-by-Step Guide}
Follow the steps below to get started using Git.
Stride 1: Install Git and Create a GitHub Account
The first thing y'all demand to do is to install Git and create a GitHub account.
At that place are several dissimilar ways to install Git. Follow the instructions below to install Git on your system:
- Install Git on Windows
- Install Git on Mac
- Install Git on Ubuntu
- Install Git on CentOS 7
- Install Git on CentOS viii
Note: If you lot already have Git installed on your machine, it's best to update to the latest version bachelor.
To update Git, follow the instructions in our commodity on how to update Git on Windows, macOS, or Linux.
After installing Git on your machine, the next step is to create a free GitHub account.
Follow these steps:
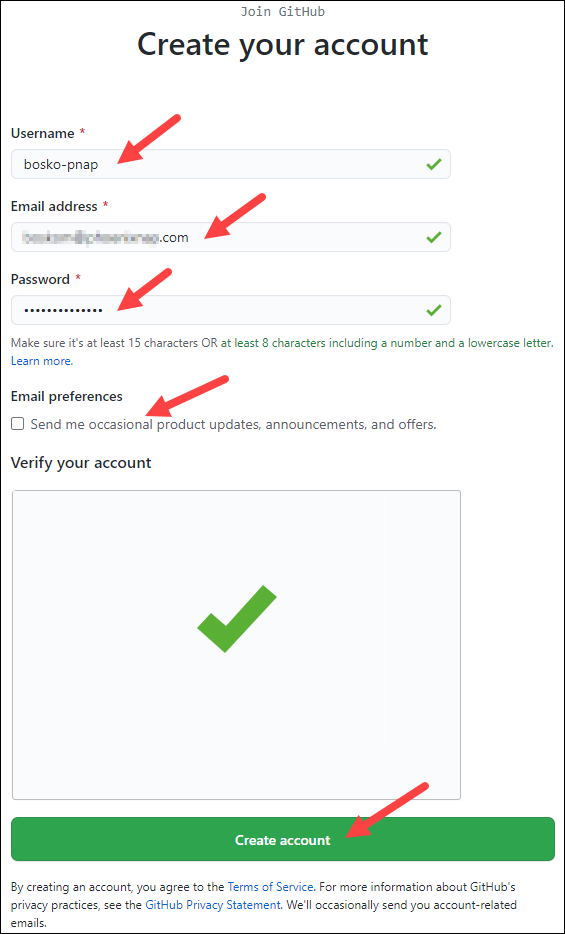
one. Visit the official account creation page: Join GitHub
2. Pick a username, enter your email address, and choose a password.
iii. Opt for or opt out of receiving updates and announcements by checking/unchecking the Email preferences checkbox.
iv. Verify y'all're non a robot by solving the Captcha puzzle.
five. Click Create account.
6. GitHub sends a launch code to the specified email address. Copy-paste the code in the designated field.
7. Optionally, enter business relationship personalization details when asked or Skip, and click Continue.
You accept now successfully created a GitHub account.
Step 2: Create a Local Git Repository
After installing or updating Git, the next step is to create a local Git repository. Our commodity explains in detail what a Git repository is and how to create one.
To create a Git repository, follow the steps below:
ane. Open a Git Bash concluding and move to the directory where yous want to go along the project on your local motorcar. For example:
cd ~/Desktop mkdir myproject cd myproject/ In this example, nosotros changed the directory to Desktop and created a subdirectory chosen myproject.
2. Create a Git repository in the selected folder by running the git init command. The syntax is:
git init [repository-name] 
At present you have successfully created a local Git repository.
Footstep three: Create a New Repository on GitHub
GitHub allows you to keep track of your code when yous're working with a squad and need to modify the project's code collaboratively.
Follow these steps to create a new repository on GitHub:
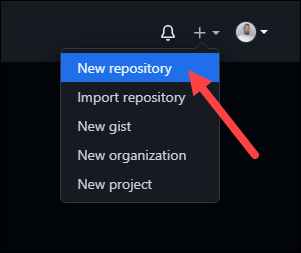
i. Log in and scan to the GitHub home folio.
2. Find the New repository option under the + sign adjacent to your contour moving picture, in the superlative correct corner.
3. Enter a proper noun for your repository, provide a brief description, and cull a privacy setting.
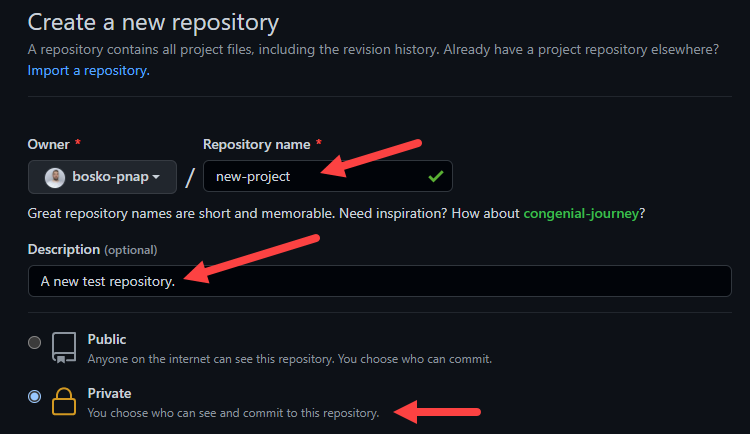
4. Click the Create repository button.
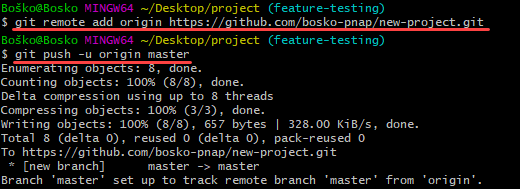
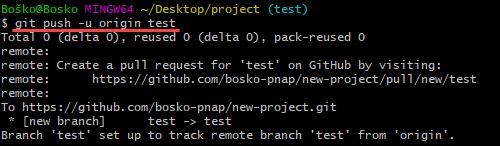
GitHub allows you to add an existing repo y'all have created locally. To push a local repository from your auto to GitHub, use the following syntax:
git remote add origin https://github.com/[your-username]/[repository-name.git] git push button -u origin primary For example:
Pace 4: Add a File to the Repository
Git notices when you add or change files in the folder containing the Git repository just doesn't track the file unless instructed. Git saves the changes but for the files it tracks, so you need to permit Git know you want to track changes for a specific file.
You tin bank check which files Git is tracking by running:
git status 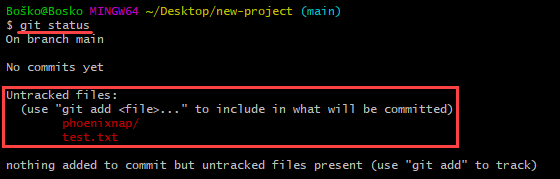
Git notifies you lot if you have any untracked files. If yous desire Git to outset tracking a file, run the post-obit command:
git add [filename] For example:
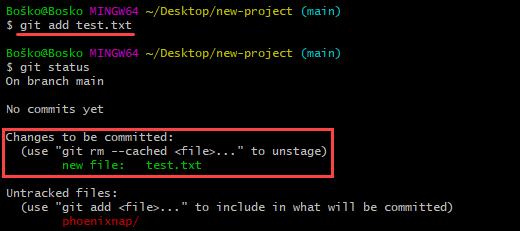
In this case, we instructed Git to starting time tracking changes for the test.txt file. Rerunning the git condition command shows that Git is tracking the specified file.
Step 5: Unstage Files on Git
Working with Git ordinarily involves calculation all the files to your index to prepare them for a commit. If yous want to remove some files from the index before committing, you have to unstage the files in Git.
One way to unstage files on Git is to run the git reset control. The syntax is:
git reset [commit] -- [file_path] For instance:

Note: You can likewise use the rm command to unstage files on Git.
The syntax is: git rm --cached [file-proper noun] .
Pace vi: Create a Commit
Later on adding the specified files to the staging environment, instruct Git to packet the files into a commit using the git commit control. Git then stores that file version. You can review the stored version at any given time.
The syntax is:
git commit -m "Notes virtually the commit" Add a message at the end of the commit to country whether information technology'south a new feature, a bug set up, or anything else. Commits remain in the repository, and they are rarely deleted, and then an caption of what you inverse helps other developers working on the project or help you go along track of all the changes.
For example:

Footstep 7: Disengage Concluding Commit
Important: Git allows users to revert the last commit. Still, other developers could have already retrieved the updated projection, and deleting updates from one system could cause conflicts for other team members.
Use the revert and reset commands to disengage changes and revert to a previous commit.
To undo a published commit, employ the post-obit syntax:
git revert [hash] A hash is a lawmaking that identifies each commit. Obtain a commit hash past running:
git log For example:
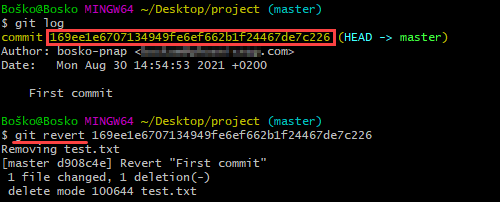
In this case, we first ran the git log control to obtain the commit hash and then reverted the final commit by running git revert with the commit hash we obtained.
Step 8: Create a New Branch
The commencement branch in a git repository is chosen chief, and it is the chief branch in a project.
Creating a new Git branch ways creating a copy of the project from a specific bespeak in time. Branches in Git allow users to make new features without applying the changes to the main co-operative while the feature is in evolution.
The common method for creating a new co-operative is by running:
git branch [new_branch_name] For example:

In this example, nosotros create a new branch named new-feature.
Pace 9: Switch Branches
Having several branches of a Git project provides a test surround for developers to track progress without affecting the production version of an application. Git allows y'all to switch betwixt branches with the checkout command easily. The syntax is:
git checkout [branch_name] Replace [branch_name] with the co-operative proper noun yous desire to access.
For example:

Step ten: Rename a Local or Remote Git Branch
In Git, you lot can rename a local or remote Git branch.
The syntax for changing a local Git branch name is:
git branch -m new-name For example:

In this example, we changed the local branch name from new-feature to characteristic-testing.
Since there isn't a way to directly rename a remote Git branch, you first demand to delete the onetime branch name, then button the new branch name to the remote repository.
Step 11: Delete a Local or Remote Git Branch
You may decide to delete a Git co-operative after merging the changes with the master branch or if the branches become corrupted.
Yous can delete local and remote Git branches.
Deleting a local co-operative doesn't touch on a remote branch. To delete a local Git co-operative, run:
git branch -d [branch_name] Utilise the following syntax to delete a remote Git branch:
git push [remote_project] --delete [branch_name] In this example, we deleted a local Git branch:

Step 12: Set Upstream Branch
Sending something upstream in Git means that yous are sending it back to the repository possessor.
Using the git set up upstream command, y'all can choose the flow direction of your current local branch. The command as well allows you to modify the default remote branch.
Our tutorial on What Is Git Upstream and How to Prepare an Upstream Branch deals with the unlike methods for setting an upstream branch and gives a detailed caption on the topic.
Step xiii: Remove a Git Remote
A git remote is a connectedness to a repository hosted on a remote server – GitHub, BitBucket, GitLab, or any other remote location.
However, over time, the remote repository may move to another host, or a team member may stop working on the project. The remote in question is and then no longer needed.
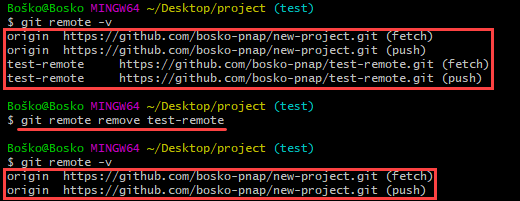
There are several means to remove a Git remote. One of the ways is to delete a remote using the command line. The syntax is:
git remote remove [remote name] In the following example, running git remote -v shows the available remotes, 'origin' and 'exam-remote.' After removing 'examination-remote' and rerunning git remote -v to list bachelor remotes, we see that the only bachelor remote is 'origin.'
Step 14: Git Merge
Git merge unifies multiple commit sequences into a single commit. It can combine two branches, thus integrating the independent evolution lines into a single branch.
After merging two branches, Git updates the electric current branch to reflect the merge, but the target branch isn't affected. That means you have to utilise the git branch -d control to delete the obsolete target co-operative.
For example, you may want to merge a new feature branch into the chief branch. Follow the steps beneath:
ane. Run the git status command to ensure that HEAD is pointing to the right merge-receiving (master) co-operative. If information technology is not, run git checkout master to switch to the master co-operative.
two. Run git fetch to pull the latest remote commits and git pull to ensure the main branch has the latest updates.

three. Run git merge X where X is the proper noun of the branch y'all want to merge into the receiving branch.

Stride fifteen: Resolve Merge Conflicts
Merge conflicts usually occur when multiple developers piece of work on the aforementioned code of a project or when they piece of work with several development branches. Git merge warns the user nearly these conflicts.
Although most merge conflicts resolve automatically, there are cases when git merge cannot resolve an issue.
Step 16: Create a Pull Request
Create a pull request (PR) to inform a repository owner that they should review the changes you lot've made to their lawmaking. Then the owner can approve the pull asking and merge the changes into the main repository.
If you are the co-owner or owner of a repository, you don't take to create pull requests to merge your changes. However, you tin can still do it to keep track of your feature updates and history.
For this guide, we will create a readme file for our repository locally and make a pull asking on GitHub to illustrate the process.
Follow the steps beneath:
1. In Git Fustigate, create an empty readme file by running touch readme.dr. .
two. Create and switch to a new co-operative on which to alter the file. Run:
git checkout -b create-readme-file 3. Open the readme file in a text editor and add the text you want information technology to contain. In this example, we will use the Nano text editor to alter the file inside the control line window. Run nano readme.md .

4. Afterward y'all save the file, track it past running git add readme.dr. .
5. Create a commit.
git commit -yard "Added a readme file" 6. Button the changes to GitHub.
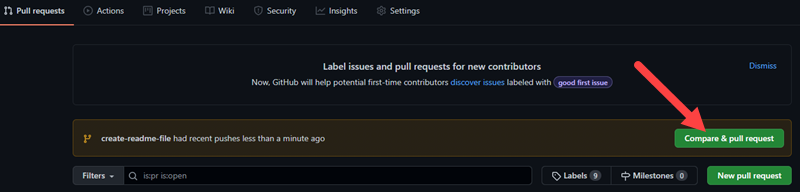
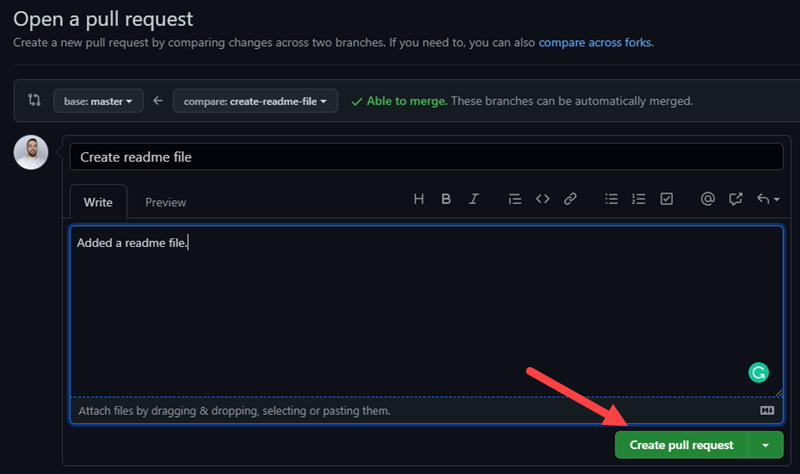
git push origin create-readme-file 7. Log in to your GitHub page. There is at present a Create pull asking option in your repository with the branch name we created in the command line. Click the Compare & pull request push.
8. GitHub states if yous tin can merge the branches and apply the changes. Optionally, add a comment about your pull request and click Create pull request.
Now the repository owner, in this case, you, can review the changes and have or decline them.
Yous tin accept the changes in the Pull requests tab on GitHub. When you merge the branches, delete the obsolete co-operative by clicking Delete branch to go along the repository make clean.
Stride 17: Synchronize Changes on GitHub and Locally
When you merge changes on GitHub, they don't appear automatically in your local repository. You accept to pull the changes to your local repository to see the updates.
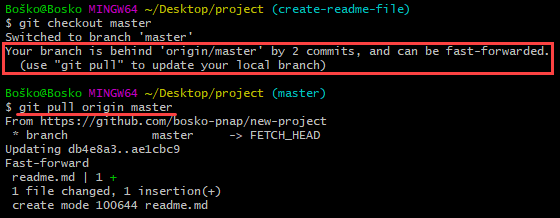
Synchronize your local repository with GitHub by running:
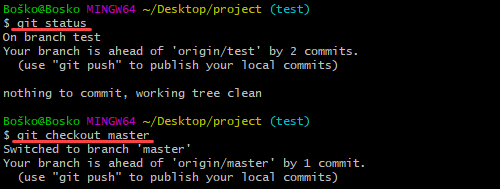
git pull origin master The command updates your local repository to lucifer the ane on GitHub, and states the changes.
In the post-obit example, we kickoff switched to our master branch, and Git warned u.s. that we should update our local repository:
Determination
You now know the basic and some more advanced Git functions. Feel free to examination them out to brand certain yous sympathise how they piece of work.
Download our Git commands cheat sail to have all Git commands in one place for future apply.
Was this article helpful?
Yes No
Source: https://phoenixnap.com/kb/how-to-use-git
Posted by: tiedemansumate.blogspot.com
0 Response to "How To Change Git Starting Path To Desktop"
Post a Comment